Showing posts with label Eclipse. Show all posts

Saturday, May 26, 2012

What is Remote Debugging - Java, Eclipse,IntelliJ IDEA, AXIS2

Now I am working as a Software Engineering Intern at WSO2. At the first week of internship with the WSO2 Application Server team, I have learned a pretty cool concept in software development called Remote Debugging of application. I feel that is a pretty strong concept which I should talk about. To learn about remote debugging I have gone through lot of articles all around the Internet. So I thought that getting all those information to one place.
If we look at to the Remote Debugging scenario it will look like this,


Some times you have to debug a application which is not running from it's source code in a IDE. So to do it we use this remote debug concept. In the scenario which is shown above the application runs in a remote machine, but when it runs it will broadcast debug information via a socket deployed. The IDE running locally will capture those broadcast debug information through that socket and it will do the debug through the source code.

JAVA language provides this in its JVM. We can use commands like this to run a application in the remote debug mode in java.

java -Xdebug -Xrunjdwp:transport=dt_socket,address=8000,suspend=n,server=y -jar Name_of_Your_Jar.jar

Then it will broadcast some debug information and will wait until some IDE capture those debug information and start debugging the source code. When Some IDE connects to the Socket specified it will start the debugging process.

Configuring the IDEs will depend on them. The links given below will give you a good understanding about those concepts. Hope you learn some thing from this post. Following links are really interesting to learn about remote debugging.

What is Remote Debugging :
http://www.javabeat.net/2010/12/what-is-remote-debugging-in-java/

Remote Debugging with Eclipse :
http://www.eclipsezone.com/eclipse/forums/t53459.html
http://java.dzone.com/articles/how-debug-remote-java-applicat
http://www.myeclipseide.com/documentation/quickstarts/remotedebugging/

Remote Debugging with IntelliJ IDEA :
http://www.javaranch.com/journal/200408/DebuggingServer-sideCode.html

Remote Debugging Web Services, Apache Axis 2 :
http://wso2.org/library/225
http://wso2.org/library/3851
http://amilamanoj.blogspot.com/2011/09/running-debugging-apache-axis2-inside.html
http://shameerarathnayaka.blogspot.com/2011/09/remote-debugging-apache-axis2-with.html

Sunday, April 1, 2012

Creating Timetable Using Genetic Algorithms - Java & JGAP

Making Timetables for an institution, considering the resources of that institution so that the resources will not be clashed on the usage with one another is NP complete task. But here we tried to implement a solution for that using Genetic Algorithms.. If we take our scenario as an example, our department needs to schedule its lecture slots so that no clashes are happening between the availability of the resources of the department. As department’s resources, we have considered lecturers’, rooms’ and students’ availabilities. If a lecture is to be held, all those who are conducting, those who are attending and the rooms where the lecture is going to held must be free at that time. So the problem is to find a way to generate a timetable. 

What is Genetic Algorithms (GA)
Genetic Algorithm (GA) is a type of Evolutionary Algorithms which adapts the evolutionary process of the genetic chromosomes into some computational problems. It has been widely used in optimization problems. In Genetic Algorithms there are basically two major components. 
  • Population
  • Fitness function
The population is which the evolution is applied on. With the evolution and the correct Fitness function which measures the fitness of a given individual entity in a population, the following generations will have better members than the earlier generation. An individual element of the population is named a Chromosome following the chromosomes in the natural genetic process. A chromosome is consisted of Genes which are in-turn consists of the data which we want the chromosome to have. Within each iteration many genetic operators are applied to the population so the next generation will be different from the current one. There are basic operators we have used in our attempt.
  • Cross-over
  • Mutation
In cross-over operation, genes from 2 chromosomes are combined to make other new chromosomes. And in mutation, some genes of a chromosome are mutated in a way that the random behaviors can be generated. This randomness important because as the iterations happen, the population tends to converge to some solution while there may be some solutions which can be more acceptable. As GA doesn’t generate the best solution but an acceptable one we have to optimize the evolution process due to the fact that an inefficient application of GA could get long time before making an acceptable solution

Application Of Genetic Algorithms

The most difficult and challenging task of the project was the application of GA into our problem. The way of application could affect the amount of resources required by the program.
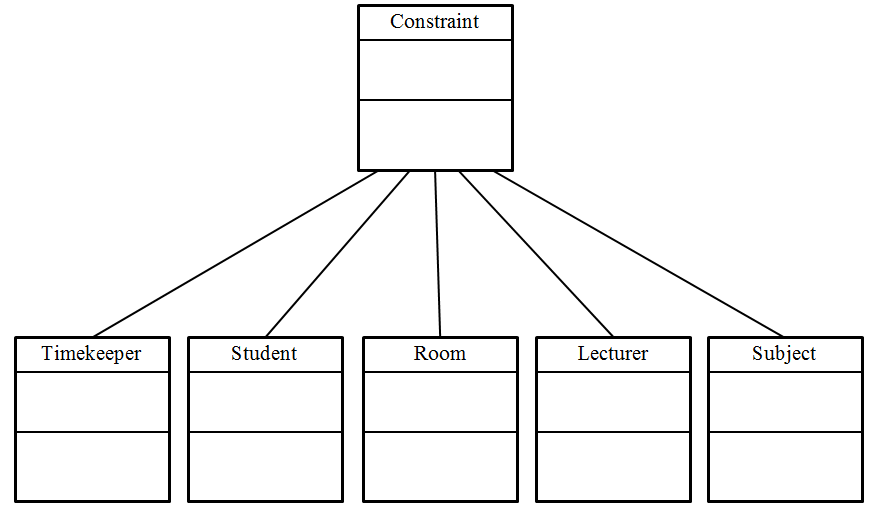
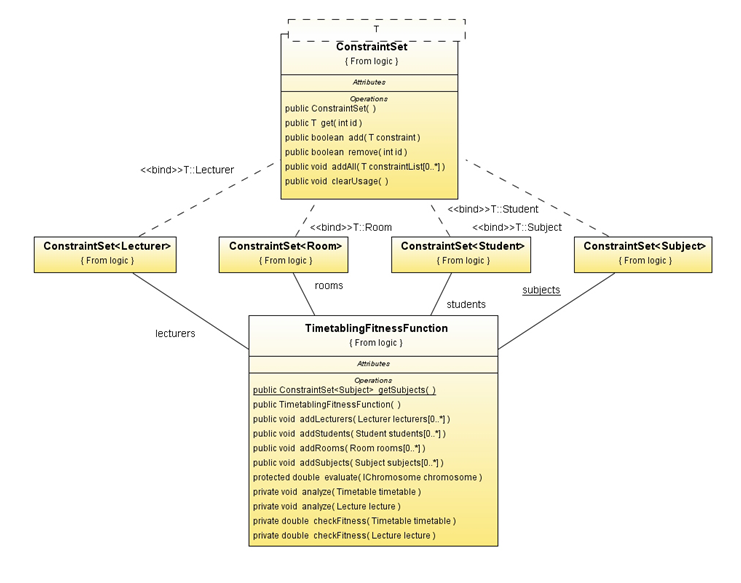
We considered the lecturers, students and rooms as constraints which will be needed to be satisfied. Each constraint contains a representation of which time slots they are available and the other time slots are considered unavailable. Each subject will have the identifications of the lecturers, students and the rooms involved with the subject and lecture slots will contain the subject and the time slots which the lecture is to be held.
In genetic algorithms the base elements of the algorithm are Chromosomes and Genes. So here we had to choose them. We will explain how we did it in next section. Also to run the algorithm we have to check the appropriateness of those genes and chromosomes. To do it we have to run a check to get the fitness for the solution. That check is run by the fitness function. We will explain it also in the next section

Implementation

For the implementation we have used Java language for programming. We used a framework named JGAP (Java Genetic Algorithm and Genetic Programming framework) for the implementation of the Genetic Algorithm. We used Java Swing framework for implementing the GUIs and data was stored in a XML file for manipulation. To represent the data used for the algorithm, we used a XML file. Following XML examples will show we did it,Each start time and other time are represented in this format,

If the time is Monday at 8 am = we represent it as 8
If the time is Monday at 1 pm = we represent it as 13
If the time is Tuesday at 8 am = we represent it as 24+8 = 32
If the time is Thursday at 3 pm = we represent it as 24+24+24+15 = 87

All the length of time slots is given in hours.

Lecturer Entity
<?xml version="1.0" encoding="UTF-8" standalone="no"?>
<lecturers count="1" >
 <lecturer id="0" >
  <name>Dr_Chandana_Gamage</name>
  <availableSlots count="5" >
   <slot>
    <start>8</start>
    <length>8</length>
   </slot>
   <slot>
    <start>32</start>
    <length>4</length>
   </slot>
   <slot>
    <start>56</start>
    <length>8</length>
   </slot>
   <slot>
    <start>80</start>
    <length>8</length>
   </slot>
   <slot>
    <start>104</start>
    <length>8</length>
   </slot>
  </availableSlots>
 </lecturer>
</lecturers>

Student Entity
<students count="1" >
    <student id="0" >
        <name>Sanka</name>
        <level>2</level>
        <availableSlots count="5" >
            <slot>
                <start>8</start>
                <length>10</length>
            </slot>
            <slot>
                <start>32</start>
                <length>10</length>
            </slot>
            <slot>
                <start>56</start>
                <length>10</length>
            </slot>
            <slot>
                <start>80</start>
                <length>10</length>
            </slot>
            <slot>
                <start>104</start>
                <length>10</length>
            </slot>
        </availableSlots>
    </student>
</students>
 

Subject Entity

Here each lecturers and students who are related the subject is represented by their id number. The potential lecture rooms for this subject is also represented by their id.  Also another important thing here is lectures and practicals of subject considered as two different subject in this implementation. That why there is a tag called isPractical.
<subjects count="1" >
    <subject id="0" >
        <name>TOC</name>
        <isAPractical>0</isAPractical>
        <lecturers count="2" >
            <id>0</id>
            <id>1</id>
        </lecturers>
        <students count="2" >
            <id>0</id>
            <id>1</id>
        </students>
        <rooms count="3" >
            <id>0</id>
            <id>1</id>
            <id>2</id>
        </rooms>
    </subject>
</subjects>

Lecture Room Entity

Here the lecture rooms and labs are identified by the tag iLectureRoom.
<rooms count="1" >
    <room id="0" >
        <name>CSLR</name>
        <seatCount>20</seatCount>
        <isLectureRoom>1</isLectureRoom>
        <availableSlots count="9" >
            <slot>
                <start>8</start>
                <length>4</length>
            </slot>
            <slot>
                <start>13</start>
                <length>5</length>
            </slot>
            <slot>
                <start>37</start>
                <length>5</length>
            </slot>
            <slot>
                <start>56</start>
                <length>4</length>
            </slot>
            <slot>
                
            </slot>
            <slot>
                <start>80</start>
                <length>4</length>
            </slot>
            <slot>
                <start>85</start>
                <length>5</length>
            </slot>
            <slot>
                <start>104</start>
                <length>4</length>
            </slot>
            <slot>
                <start>109</start>
                <length>5</length>
            </slot>
        </availableSlots>
    </room>
</rooms>

Lecture Entity

This is the most important entity in the XML representation. Here the data in side lecture tag represent the time table. At the beginning, before the time table generating algorithm runs we have add lecture entity. But the start time of the lecture,venue cant be said at the beginning. So we used the following approach to represent the lecture data,
<lectures count="1" >
       <lecture id="0" level="2" >
           <subject>0</subject>
           <room>0</room>
           <slot>
                <start>0</start>
                <length>2</length>
           </slot>
       </lecture>
</lectures>
Here the room,start tags cant be finalized at the beginning. Because they change while the time table algorithm runs. So at the beginning we set them to default value of 0. All the lecture entries will be same as that at the beginning. But after the time table algorithm runs, those tags will be change like this,
<lectures count="1" >
       <lecture id="0" level="2" >
           <subject>0</subject>
           <room>3</room>
           <slot>
                <start>15</start>
                <length>2</length>
           </slot>
       </lecture>
</lectures>


We followed five basic steps to implement the Algorithm.

  1. Plan the Chromosome.
We have decided following structure of chromosomes and genes. We choose the four time tables set as a chromosome and each one time table as a gene. For each evolving iteration those genes and chromosomes are changed by crossover and mutation.
 
  1. Implement a "fitness function".

    To Implement a fitness function in this problem. We have to add constrains to be checked in the fitness function. So following structure we implemented for the constrains.

 
At the concrete  implementation of these constrains we follow the following structure,

  1. Setup a Configuration object.
  1. Create a population of potential solutions.

  1. Evolve the population
    Generating a good solution set from the initially created solution set is process of evolution in genetic algorithms. To evolve a population of solutions we took two approaches. One is changing a  chromosome Little bit by changing a lecture time or venue and checking it with the fitness functions to check the fitness. If the fitness is up to some value it will put to the next population. This process is called the mutation process.
    Other process is called the cross over process. In it we took one part form one chromosome and other part form other chromosome. Then we join it to have a new solution. Then we check with the fitness functions to check the fitness. If the fitness is up to some value it will put to the next population.
    So in the evolution process these two happens for the population to get the next population. So what we did was evolving the initial population for number of iteration to get the new populations. At each evolution the population move towards the optimal solution. The number of evolutions is proportional to the correctness of the population. So following graph will show how our implementation behaves with respect to the number of evolutions. Here the y axis gives the fitness value of the population,


So like wise doing number of evolutions we can deduce a good timetable according to our given constrains. We have created a GUI also so user of this solution can change those constraints easily.

Friday, February 24, 2012

Accessing Apache Axis2 Web service inside a Android Application - Part 2 - Apache Axis 2, Android API 8, phpmyadmin, Eclipse Indigo, VMware Player

Part 2

As I explained in my earlier post,  Accessing Apache Axis2 Web service inside a Android Application - Part 1 you can create a web service. In this post I will explain how to create a android application use this web service. In my example's web service, it can give you details about cities and places in Sri Lanka. So we will query that service to get those data,

Step 1 - Create a new android project in Eclipse.
Step 2 - Add internet permission to the Android Application by editing AndroidManifest.xml file like this.

<?xml version="1.0" encoding="utf-8"?>
<manifest xmlns:android="http://schemas.android.com/apk/res/android"
    package="org.web.frontend.calculator"
    android:versionCode="1"
    android:versionName="1.0" >

    <uses-sdk android:minSdkVersion="8" />
    <uses-permission android:name="android.permission.INTERNET" />
    <application
        android:icon="@drawable/ic_launcher"
        android:label="@string/app_name" >
        <activity
            android:name=".AndroidFrontendActivity"
            android:label="@string/app_name" >
            <intent-filter>
                <action android:name="android.intent.action.MAIN" />

                <category android:name="android.intent.category.LAUNCHER" />
            </intent-filter>
        </activity>
    </application>

</manifest>
Step 3 - Edit the main.xml file like this.

<?xml version="1.0" encoding="utf-8"?>
<LinearLayout xmlns:android="http://schemas.android.com/apk/res/android"
    android:layout_width="fill_parent"
    android:layout_height="fill_parent"
    android:orientation="vertical" >
    <TextView
        android:id="@+id/txtCityLongitude"
        android:layout_width="fill_parent"
        android:layout_height="wrap_content"
        android:text="@string/hello" />
    <TextView
        android:id="@+id/txtCityLatitude"
        android:layout_width="fill_parent"
        android:layout_height="wrap_content"
        android:text="@string/hello" />
    <TextView
        android:id="@+id/txtIMLon"
        android:layout_width="fill_parent"
        android:layout_height="wrap_content"
        android:text="@string/hello" />
    <TextView
        android:id="@+id/txtIMLat"
        android:layout_width="fill_parent"
        android:layout_height="wrap_content"
        android:text="@string/hello" />
    <TextView
        android:id="@+id/txtIMCat"
        android:layout_width="fill_parent"
        android:layout_height="wrap_content"
        android:text="@string/hello" />
    <TextView
        android:id="@+id/txtIMDes"
        android:layout_width="fill_parent"
        android:layout_height="wrap_content"
        android:text="@string/hello" />

</LinearLayout>


Step 3 - I use KSOAP as my connection between web service and Android App. So download it from here. 

kSOAP2 - An efficient, lean, Java SOAP library for constrained devices

Add it to your android project. Right click on your project go to Java Build Path > Add External Jar
and select kSOAP.

Step 4 - Edit the java activity file like this.

package org.web.frontend.calculator;

import org.ksoap2.SoapEnvelope;
import org.ksoap2.serialization.SoapObject;
import org.ksoap2.serialization.SoapSerializationEnvelope;
import org.ksoap2.transport.HttpTransportSE;
import android.app.Activity;
import android.os.Bundle;
import android.widget.TextView;

public class AndroidFrontendActivity extends Activity {

    private String METHOD_NAME = "";
    // our webservice method name
    private String NAMESPACE = "http://ws.travel_ceylon.web.org";
    // Here package name in webservice with reverse order.
    private String SOAP_ACTION = NAMESPACE + METHOD_NAME;
    // NAMESPACE + method name
    private static final String URL = "http://192.168.177.130:8080/Travel_Ceylon_Central_Web_Service/services/Travel_Ceylon_Web_Service?wsdl";

    // you must use ipaddress here, don’t use Hostname or localhost

    /** Called when the activity is first created. */
    @Override
    public void onCreate(Bundle savedInstanceState) {
        super.onCreate(savedInstanceState);
        setContentView(R.layout.main);

        String city = "Matara";
        String im = "Galle Face";

        METHOD_NAME = "getLongitude_City";
        try {
            SoapObject request = new SoapObject(NAMESPACE, METHOD_NAME);
            request.addProperty("city", city);
            SoapSerializationEnvelope envelope = new SoapSerializationEnvelope(
                    SoapEnvelope.VER11);
            envelope.dotNet = true;
            envelope.setOutputSoapObject(request);
            HttpTransportSE androidHttpTransport = new HttpTransportSE(URL);
            androidHttpTransport.call(SOAP_ACTION, envelope);
            Object result = envelope.getResponse();
            ((TextView) findViewById(R.id.txtCityLongitude)).setText(city
                    + " Longitude is : " + result.toString());

        } catch (Exception E) {
            E.printStackTrace();
            ((TextView) findViewById(R.id.txtCityLongitude)).setText("ERROR:"
                    + E.getClass().getName() + ":" + E.getMessage());
        }
        METHOD_NAME = "getLatitude_City";
        try {
            SoapObject request = new SoapObject(NAMESPACE, METHOD_NAME);
            request.addProperty("city", city);
            SoapSerializationEnvelope envelope = new SoapSerializationEnvelope(
                    SoapEnvelope.VER11);
            envelope.dotNet = true;
            envelope.setOutputSoapObject(request);
            HttpTransportSE androidHttpTransport = new HttpTransportSE(URL);
            androidHttpTransport.call(SOAP_ACTION, envelope);
            Object result = envelope.getResponse();
            ((TextView) findViewById(R.id.txtCityLatitude)).setText(city
                    + " Latitude : " + result.toString());

        } catch (Exception E) {
            E.printStackTrace();
            ((TextView) findViewById(R.id.txtCityLatitude)).setText("ERROR:"
                    + E.getClass().getName() + ":" + E.getMessage());
        }

        METHOD_NAME = "getLongitude_Im_Place";
        try {
            SoapObject request = new SoapObject(NAMESPACE, METHOD_NAME);
            request.addProperty("place", im);
            SoapSerializationEnvelope envelope = new SoapSerializationEnvelope(
                    SoapEnvelope.VER11);
            envelope.dotNet = true;
            envelope.setOutputSoapObject(request);
            HttpTransportSE androidHttpTransport = new HttpTransportSE(URL);
            androidHttpTransport.call(SOAP_ACTION, envelope);
            Object result = envelope.getResponse();
            ((TextView) findViewById(R.id.txtIMLon)).setText(im
                    + " Longitude : " + result.toString());

        } catch (Exception E) {
            E.printStackTrace();
            ((TextView) findViewById(R.id.txtIMLon)).setText("ERROR:"
                    + E.getClass().getName() + ":" + E.getMessage());
        }

        METHOD_NAME = "getLatitude_Im_Place";
        try {
            SoapObject request = new SoapObject(NAMESPACE, METHOD_NAME);
            request.addProperty("place", im);
            SoapSerializationEnvelope envelope = new SoapSerializationEnvelope(
                    SoapEnvelope.VER11);
            envelope.dotNet = true;
            envelope.setOutputSoapObject(request);
            HttpTransportSE androidHttpTransport = new HttpTransportSE(URL);
            androidHttpTransport.call(SOAP_ACTION, envelope);
            Object result = envelope.getResponse();
            ((TextView) findViewById(R.id.txtIMLat)).setText(im
                    + " Latitude : " + result.toString());

        } catch (Exception E) {
            E.printStackTrace();
            ((TextView) findViewById(R.id.txtIMLat)).setText("ERROR:"
                    + E.getClass().getName() + ":" + E.getMessage());
        }

        METHOD_NAME = "getCategory_Im_Place";
        try {
            SoapObject request = new SoapObject(NAMESPACE, METHOD_NAME);
            request.addProperty("place", im);
            SoapSerializationEnvelope envelope = new SoapSerializationEnvelope(
                    SoapEnvelope.VER11);
            envelope.dotNet = true;
            envelope.setOutputSoapObject(request);
            HttpTransportSE androidHttpTransport = new HttpTransportSE(URL);
            androidHttpTransport.call(SOAP_ACTION, envelope);
            Object result = envelope.getResponse();
            ((TextView) findViewById(R.id.txtIMCat)).setText(im
                    + " Category : " + result.toString());

        } catch (Exception E) {
            E.printStackTrace();
            ((TextView) findViewById(R.id.txtIMCat)).setText("ERROR:"
                    + E.getClass().getName() + ":" + E.getMessage());
        }

        METHOD_NAME = "getDescription_Im_Place";
        try {
            SoapObject request = new SoapObject(NAMESPACE, METHOD_NAME);
            request.addProperty("place", im);
            SoapSerializationEnvelope envelope = new SoapSerializationEnvelope(
                    SoapEnvelope.VER11);
            envelope.dotNet = true;
            envelope.setOutputSoapObject(request);
            HttpTransportSE androidHttpTransport = new HttpTransportSE(URL);
            androidHttpTransport.call(SOAP_ACTION, envelope);
            Object result = envelope.getResponse();
            ((TextView) findViewById(R.id.txtIMDes)).setText(im
                    + " Description : " + result.toString());

        } catch (Exception E) {
            E.printStackTrace();
            ((TextView) findViewById(R.id.txtIMDes)).setText("ERROR:"
                    + E.getClass().getName() + ":" + E.getMessage());
        }
    }
}


I will explain this code like this, Here are the variable assignments,


    private String METHOD_NAME = "";
    // Here you have to put your method you are calling
    // I am calling float getLongitude_City(String city) so I assign this variable like this. METHOD_NAME = "getLongitude_City";
    private String NAMESPACE = "http://ws.travel_ceylon.web.org";
    // Here package name in webservice with reverse order.
    private String SOAP_ACTION = NAMESPACE + METHOD_NAME;
    // NAMESPACE + method name
    private static final String URL = "http://192.168.177.130:8080/Travel_Ceylon_Central_Web_Service/services/Travel_Ceylon_Web_Service?wsdl";

    // you must use ipaddress here, don’t use Hostname or localhost
    // That is why I used a virtual machine to have a small network inside my machine.


Next I will explain the other part of the source,

  METHOD_NAME = "getLongitude_City";

  try {
   SoapObject request = new SoapObject(NAMESPACE, METHOD_NAME);
   request.addProperty("city", city);
   // Here we bind parmeters to our SOAP packet.
   // in my getLongitude_City"it has a argument called city of Stirng
   // type. This is the way I assigen value to it.

   SoapSerializationEnvelope envelope = new SoapSerializationEnvelope(
   SoapEnvelope.VER11);
   envelope.dotNet = true;
   envelope.setOutputSoapObject(request);
   HttpTransportSE androidHttpTransport = new HttpTransportSE(URL);
   androidHttpTransport.call(SOAP_ACTION, envelope);
   Object result = envelope.getResponse();
   // Here we get the reposnse from the SOAP object.
   ((TextView) findViewById(R.id.txtCityLongitude)).setText(city
   + " Longitude is : " + result.toString());
  } catch (Exception E) {
   E.printStackTrace();
   ((TextView) findViewById(R.id.txtCityLongitude)).setText("ERROR:"
   + E.getClass().getName() + ":" + E.getMessage());
  }


After doing all these editing. Go to the virtual machine and run the web service. Check the connectivity between virtual machine and your machine. Then run the Android app. then you can see these information come from the web service.


Hope this article helped you. Please put comments about my article. It will help me to improve my articles in the future.

Accessing Apache Axis2 Web service inside a Android Application - Part 1 - Apache Axis 2, Android API 8, phpmyadmin, Eclipse Indigo, VMware Player

Part 1

In this series of articles I am going to show you the complete set of steps to access a web service inside Android application. I am expecting you to have knowledge about following,
  • Create a web service using Apache Axis 2 and Eclipse. (If you don't know here are some useful links : Link1 , Link 2)
  • Create a simple web service client using Axis2 plug in and Eclipse. (If you don't know here are some useful links : Link1)
  • Create a simple android project with text fields to show some texts. (If you don't know here are some useful links : Link1)
  • More importantly you have to have a working virtual machine inside  your machine using something like VMware player. Also you have to have a host only private network with this virtual machine and you machine. Also you have to install Eclipse,Apache axis 2 and tomcat server in this virtual machine.
So having those prerequisites I will continue like this.I am going to create a simple web service which is capable to give data to it users by querying a local database it has.

Step 1- In my example I use a database called travel_ceylon. So In side your virtual machine create a database using phpmyadmin. and import following sql file to that database,

SET SQL_MODE="NO_AUTO_VALUE_ON_ZERO";
SET time_zone = "+00:00";

CREATE TABLE IF NOT EXISTS `category` (
  `Category` varchar(100) NOT NULL
) ENGINE=InnoDB DEFAULT CHARSET=latin1;

INSERT INTO `category` (`Category`) VALUES
('History'),
('Religon - Buddhisum'),
('Religon - Catholic'),
('Religon - Islam'),
('Religon - Hindu'),
('Technology'),
('Nature');

CREATE TABLE IF NOT EXISTS `city` (
  `City_Name` varchar(100) NOT NULL,
  `Latitude` float NOT NULL,
  `Longitude` float NOT NULL,
  PRIMARY KEY (`City_Name`)
) ENGINE=InnoDB DEFAULT CHARSET=latin1 ROW_FORMAT=DYNAMIC;


INSERT INTO `city` (`City_Name`, `Latitude`, `Longitude`) VALUES
('Aluthgama', 6.59991, 79.9568),
('Ambalangoda', 6.2367, 80.0544),
('Matara', 5.94413, 80.5494),
('Monaragala', 6.87268, 81.3506),
('Moratuwa', 6.77453, 79.8826),
('Wellawaya', 6.73203, 81.1019);

CREATE TABLE IF NOT EXISTS `close_to` (
  `City_Name` varchar(100) NOT NULL,
  `Place_Name` varchar(100) NOT NULL,
  `Distance` float NOT NULL,
  KEY `City_Name` (`City_Name`,`Place_Name`),
  KEY `Place_Name` (`Place_Name`)
) ENGINE=InnoDB DEFAULT CHARSET=latin1 ROW_FORMAT=DYNAMIC;

CREATE TABLE IF NOT EXISTS `important_places` (
  `Place_Name` varchar(100) NOT NULL,
  `Category` varchar(200) NOT NULL,
  `Description` varchar(500) NOT NULL,
  `Latitude` float NOT NULL,
  `Longitude` float NOT NULL,
  PRIMARY KEY (`Place_Name`)
) ENGINE=InnoDB DEFAULT CHARSET=latin1 ROW_FORMAT=DYNAMIC;

INSERT INTO `important_places` (`Place_Name`, `Category`, `Description`, `Latitude`, `Longitude`) VALUES
('Galle Face', 'Lesuire,History', 'Park', 6.92496, 79.8446),
('Gangaramya Temple', 'Buddhisum,History,Religon', 'A Big Temple in Colombo', 6.91625, 79.8563),
('Viharamahadevia Park', 'Lesuire', 'Park', 6.91379, 79.8626),
('Weherahena Temple', 'Buddhisum,History,Religon', 'Weherahena Temple with a hugh Buddha Satchive', 5.95313, 80.5759);

CREATE TABLE IF NOT EXISTS `important_places_for_approval` (
  `Place_Name` varchar(100) NOT NULL,
  `Category` varchar(150) NOT NULL,
  `Description` varchar(500) NOT NULL,
  `Longitude` float NOT NULL,
  `Latitude` float NOT NULL
) ENGINE=MyISAM DEFAULT CHARSET=latin1;

ALTER TABLE `close_to`
  ADD CONSTRAINT `close_to_ibfk_1` FOREIGN KEY (`City_Name`) REFERENCES `city` (`City_Name`) ON DELETE CASCADE ON UPDATE CASCADE,
  ADD CONSTRAINT `close_to_ibfk_2` FOREIGN KEY (`Place_Name`) REFERENCES `important_places` (`Place_Name`) ON DELETE CASCADE ON UPDATE CASCADE;

Step 2 - Create a Dynamic Web Project using Eclipse inside your virtual machine. Put this as your web service definition,

package org.web.travel_ceylon.ws;

import java.sql.DriverManager;
import java.sql.ResultSet;
import java.sql.SQLException;

import com.mysql.jdbc.Connection;
import com.mysql.jdbc.Statement;

public class Travel_Ceylon_Web_Service {
 private String url;
 private Connection con;
 private Statement stmt;

 public void connectToDB() {
  url = "jdbc:mysql://localhost:3306/travel_ceylon";
  try {
   Class.forName("com.mysql.jdbc.Driver");
   con = (Connection) DriverManager.getConnection(url, "root", "");
  } catch (Exception e) {
   System.out.println("Error - Unable to Connect to the Database" + e);

  }
 }

 public float getLongitude_City(String city) {
  connectToDB();
  float lngt = 0;
  try {
   stmt = (Statement) con.createStatement();
   ResultSet rs = stmt
     .executeQuery("SELECT Longitude FROM city WHERE City_Name='"
       + city + "'");
   rs.next();
   lngt = rs.getFloat("Longitude");
  } catch (SQLException e) {
   System.out.println("Error - Unable to get longitude of " + city
     + " :" + e);
  }
  return lngt;
 }

 public float getLatitude_City(String city) {
  connectToDB();
  float latt = 0;
  try {
   stmt = (Statement) con.createStatement();
   ResultSet rs = stmt
     .executeQuery("SELECT Latitude FROM city WHERE City_Name='"
       + city + "'");
   rs.next();
   latt = rs.getFloat("Latitude");
  } catch (SQLException e) {
   System.out.println("Error - Unable to get latitude of " + city
     + " :" + e);
  }
  return latt;
 }

 public float getLongitude_Im_Place(String place) {
  connectToDB();
  float lngt = 0;
  try {
   stmt = (Statement) con.createStatement();
   ResultSet rs = stmt
     .executeQuery("SELECT Longitude FROM important_places WHERE Place_Name='"
       + place + "'");
   rs.next();
   lngt = rs.getFloat("Longitude");
  } catch (SQLException e) {
   System.out.println("Error - Unable to get longitude of " + place
     + " :" + e);
  }
  return lngt;
 }

 public float getLatitude_Im_Place(String place) {
  connectToDB();
  float latt = 0;
  try {
   stmt = (Statement) con.createStatement();
   ResultSet rs = stmt
     .executeQuery("SELECT Latitude FROM important_places WHERE Place_Name='"
       + place + "'");
   rs.next();
   latt = rs.getFloat("Latitude");
  } catch (SQLException e) {
   System.out.println("Error - Unable to get latitude of " + place
     + " :" + e);
  }
  return latt;
 }

 public String getCategory_Im_Place(String place) {
  connectToDB();
  String cat = "";
  try {
   stmt = (Statement) con.createStatement();
   ResultSet rs = stmt
     .executeQuery("SELECT Category FROM important_places WHERE Place_Name='"
       + place + "'");
   rs.next();
   cat = rs.getString("Category");
  } catch (SQLException e) {
   System.out.println("Error - Unable to get  Category of " + place
     + " :" + e);
  }
  return cat;
 }

 public String getDescription_Im_Place(String place) {
  connectToDB();
  String des = "";
  try {
   stmt = (Statement) con.createStatement();
   ResultSet rs = stmt
     .executeQuery("SELECT Description FROM important_places WHERE Place_Name='"
       + place + "'");
   rs.next();
   des = rs.getString("Description");
  } catch (SQLException e) {
   System.out.println("Error - Unable to get Description of " + place
     + " :" + e);
  }
  return des;
 }
} 

Step 3 - Run your web service project in the tomcat server on eclipse. Yo will get your WSDL file like this


You know that this web service running inside the virtual machine you have. Also As I explained earlier you have host only network between virtual machine and your machine. So this web service can be access via your original machine. To verify that please enter this in your web browserhttp://Virtual Machines IP address:8080/Travel_Ceylon_Central_Web_Service/services/Travel_Ceylon_Web_Service?wsdl. In my example it was this. http://192.168.177.130:8080/Travel_Ceylon_Central_Web_Service/services/Travel_Ceylon_Web_Service?wsdl  Then you can see this in your web browser.


So know you have a web service which can be accessible through a network. So lets proceed to the part of creating 
Android Client which use this web service. I will explain it in my next post.

Monday, February 13, 2012

How to create Multiple Screens in Android Applications : Android API 15, Eclipse


In this post I will show you the way I found to have multiple screens in your Android Application. To do this I used Eclipse as my IDE. And I used Android API 15 as my development environment.
When you create a new Android project in Eclipse, you can find that it will auto generate a main.xml file and the particular .java file for handling that. Lets see a screen shot of that.


When you insert some code and run it, it will show a single screen like this,


So this way you can develop your single screen android applications. Until you need single screen to develop a application it will be not a problem. But when you want to have several screens in your app and you need to navigate though them. You are in trouble. So I found out a way to do this. So I thought to share it with you guys.
To have multiple screen, first of all you have to create XML files for those screens. So in your projects res/layout folder create a new android XML file. then it will generate a new screen. Here is the way I created, Lets see a screen shot :


 Here In my project I have created three screens. In the main.xml file It will show the well come screen. In there I have put a button. When the user push that button then user will brought to the second screen which is named as selection_screen.xml. To do that we have to have a .java file for the selection_screen.xml. So I have created a java file for that. Here it is :


So how we use this xml files java files to achieve our task of switch between screens? As you know each and every screen in Android is a activity. So first of all we have to introduce our new screen as a activity to the Android app. To do that you have to edit the AndroidManifest.xml.

To add a new activity, you have to add this element as child element of application,


<?xml version="1.0" encoding="utf-8"?>
 <activity
            android:name=".You Java Files Name"
            android:label="Any name you want show as the title of the activity window." &gt;
</activity>

Here is my Example,


<?xml version="1.0" encoding="utf-8"?>
<manifest xmlns:android="http://schemas.android.com/apk/res/android"
    package="travelceylon.client"
    android:versionCode="1"
    android:versionName="1.0" >


    <uses-sdk android:minSdkVersion="15" />


    <application
android:icon="@drawable/ic_launcher"
        android:label="Travel Ceylon" >
        <activity
            android:name=".Travel_CeylonActivity"
            android:label="Travel Ceylon" >
            <intent-filter>
                <action android:name="android.intent.action.MAIN" />


                <category android:name="android.intent.category.LAUNCHER" />
            </intent-filter>
        </activity>
        <activity
            android:name=".SelectionActivity"
            android:label="Travel Ceylon Selection" >
        </activity>
        <activity
            android:name=".Important_place_addActivity"
            android:label="Add Importatn place to Travel Ceylon" >
        </activity>
    </application>


</manifest>


So after adding this you can see the R.java file in you application is generated. With your new elements in your new screens. So next thing is to add some code to those java files to navigate through screens. Here is the code you should add to your onCreate() method. It will show the new screen when  you press a button.


Button b = (Button) findViewById(R.id.button1); // Here the R.id.button1 is the button form you design
           b.setOnClickListener(new View.OnClickListener() {
           public void onClick(View arg0) {
           Intent i = new Intent(Current Java Files Name.this, The name of the next java files which will be executed on the button click.class);
           startActivity(i);
           }
});

Here is my example. It will guide user from Travel_CeylonActivity to SelectionActivity when user push the button Enter Travel Ceylon.


package travelceylon.client;


import android.app.Activity;
import android.content.Intent;
import android.os.Bundle;
import android.view.View;
import android.widget.Button;


public class Travel_CeylonActivity extends Activity {
    /** Called when the activity is first created. */
    @Override
    public void onCreate(Bundle savedInstanceState) {
        super.onCreate(savedInstanceState);
        setContentView(R.layout.main);
        Button b = (Button) findViewById(R.id.button1);
        b.setOnClickListener(new View.OnClickListener() {
           public void onClick(View arg0) {
           Intent i = new Intent(Travel_CeylonActivity.this, SelectionActivity.class);
           startActivity(i);
           }
        });
    }
}

After doing this I have edited the SelectionActivity.java like this, It also have two buttons and I have code it for go to another screen when I push a button.


package travelceylon.client;


import android.app.Activity;
import android.content.Intent;
import android.os.Bundle;
import android.view.View;
import android.widget.Button;


public class SelectionActivity extends Activity {
public void onCreate(Bundle icicle)
  {
     super.onCreate(icicle);
     setContentView(R.layout.selection_screen);
     Button b = (Button) findViewById(R.id.button3);
       b.setOnClickListener(new View.OnClickListener() {
          public void onClick(View arg0) {
          Intent i = new Intent(SelectionActivity.this, Important_place_addActivity.class);
          startActivity(i);
          }
       });
  }
}

So after that you can run your application. You can see that when you press the button it will take you from screen 1 to screen 2. So like wise customize this approach to your app. I thought this will help you. Please leave your comments.


Friday, January 20, 2012

Travel Ceylon : Intelligent Travel Planner for Sri Lanka : Build On Top of Android OS, Apache Axis2 and GPS

This is a Travel planning application which is based on Sri Lanka. User can plan their own travel according to the following constrains, after processing all those constrains the Travel Ceylon app will suggest you are travel path to follow and list of interesting place which you can see on the path.

I. Interest list of the traveler.
II. Starting position.
III. Time period of travel.
IV. Special places to be included.
V. Special places to be avoided.

On the way of travel, if the traveler reaches a particular important place which was highlighted in the travel plan, app will pop up and give you the details about the arriving place and all the guidelines to arrive the place.
User can add new details to the central data store of the Travel Ceylon system on the approval of administrator

This is the high level architecture of the Travel Ceylon system,


The Travel Ceylon system will look like this after the deployment,

Screen of Travel Ceylon App Looks Like this,