Saturday, June 30, 2012

WSDL2Java conversion in Apache Ant using Apache CXF

If you use  Apache Ant to automate your build process, most of the cases this will be a very useful thing to remember. If you want to to generate a Java code using WSDL file this is the way to do it. To do it you need to have Apache CXF as a dependency. Following ant file will gerate a Java code using a given WSDL file.

<project default="compile-all">

    <property name="classes" value="$classes"/>
    <property name="genCode" value="$genCode"/>
    <property name="dependencies" value="$dependencies"/>
    <path id="class.path">
        <fileset dir="${dependencies}">
            <include name="**"/>
        </fileset>
    </path>  
    <target name="init">
        <mkdir dir="${classes}"/>
        <mkdir dir="${genCode}"/>
    </target>
    <target name="cxfWSDLToJava" depends ="init ">
      <echo message="Genarating WSDLToJava"/>    
      <java classname="org.apache.cxf.tools.wsdlto.WSDLToJava" fork="true">
         <arg value="-client"/>
         <arg value="-d"/>
         <arg value="${genCode}"/>
         <arg value="-b"/>
         <arg value="./async_binding.xml"/>
         <arg value="./hello_world_async.wsdl"/>
         <classpath>
        <path refid="class.path"/>
         </classpath>
      </java>
    </target>
    <target name="compile-all" depends="cxfWSDLToJava">
        <javac debug="on" destdir="${classes}">
            <src path="${genCode}"/>
            <classpath refid="class.path"/>
        </javac>
    </target>    
</project> 

This task will do WSDL2Java conversion. You need to have a dependencies directory created with the necessary cxf jars. You can find them here, http://cxf.apache.org/download.html Also if you need other dependencies to compile you have to put those jars there.Also for further customization please visit this url http://cxf.apache.org/docs/wsdl-to-java.html

Tuesday, May 29, 2012

Writing a Apache Axis2 Module

As intern at WSO2 we learn lot about Apache Axis 2, because my team at WSO2 works on a product called Application Server  which is based on Axis2. So we have to play a lot with Axis2. The most interesting thing I have done with Axis2 is extending by writing a module to it. Here I am going to talk about how to do it. I will explain how I did it.

Before read this article about Writing a Module, Better you read these articles to get a better picture about Apache Axis 2 and it's underlining architecture,

What is Apache Axis2 :
http://axis.apache.org/axis2/java/core/

How to write a Apache Axis2 Web Service :
http://wso2.org/library/95

What is a Apache Axis2 Module :
http://axis.apache.org/axis2/java/core/docs/Axis2ArchitectureGuide.html

Also there is a interesting book written by Mr Afkham Azeez and Mr Deepal Jayasinghe. It explain all about Apache Axis2. Please read it to have 100% understanding about Axis 2. The book is Apache Axis2 Web Services, 2nd Edition.

If you have read those articles or had prior knowledge you can understand that a module will add some functionality to the execution chain of axis2 handlers. Single module can have more than one handler. So here in this example I will explain how I wrote my simple axis2 module 2 print the SOAP message content to the info log.

To follow this article you need to have a web services hosted in the simple axis2 server provided by the axis2 distribution. I have add a simple web service to my axis2 server and it is up and running when I start writing the module.  Here are the steps I followed to create and run my web Service.

Definition of My Web Services :

package org.wso2.testws;
public class TestWebService {
    public String sayHello(String name) {
        return "Hello " + name;
    }
    public int add(int x,int y){
        return x+y;
    }
}


My services.xml file :

<service name="TestWebService" >
    <Description>
        This web Service is written for test the functionlity of a AXIS2 Module
    </Description>
    <messageReceivers>
        <messageReceiver mep="http://www.w3.org/2004/08/wsdl/in-only" class="org.apache.axis2.rpc.receivers.RPCInOnlyMessageReceiver" />
        <messageReceiver  mep="http://www.w3.org/2004/08/wsdl/in-out"  class="org.apache.axis2.rpc.receivers.RPCMessageReceiver"/>
    </messageReceivers>
    <parameter name="ServiceClass" locked="false">org.wso2.testws.TestWebService</parameter>
</service>


My Folder Stricture :

TestWebService >
      TestWebService.java
      Temp>
           META-INF>
                services.xml
           org>
                wso2>
                     testws>
                          TestWebService.class

After having all these I build my TestWebService.aar file using this command,

jar -cvf TestWebService.aar *

Then I copied that archive to the repository/services folder of the axis2 home folder. Then I run the axis2server.sh script to run the simple server. Then you can see that my new service is successfully deployed.

After that we can start the development of the Axis2 Module. For that purpose I use the Eclipse IDE. Create a new java project in Eclipse and have the following structure in your project.

Here you can see that Axis2 has been added as a library to the project. To do it, right click on the project and got to Build Path > Configure Build Path. There you can find a button called Add Library, click on it and select User Library in the appearing screen. There go to new and add all the jar files in the lib folder in the axis2 home folder.

Then the definition of the TestModule.java is this,

package org.wso2.testa2m;

import org.apache.axis2.AxisFault;
import org.apache.axis2.context.ConfigurationContext;
import org.apache.axis2.description.AxisDescription;
import org.apache.axis2.description.AxisModule;
import org.apache.axis2.modules.Module;
import org.apache.neethi.Assertion;
import org.apache.neethi.Policy;

public class TestModule implements Module{

    public void init(ConfigurationContext configContext, AxisModule module) throws AxisFault {
    }

    public void engageNotify(AxisDescription axisDescription) throws AxisFault {
    }

    public void shutdown(ConfigurationContext configurationContext) throws AxisFault {
    }
    
    public String[] getPolicyNamespaces() {
        return null;    
    }

    public void applyPolicy(Policy policy, AxisDescription axisDescription) throws AxisFault {
    }
           
    public boolean canSupportAssertion(Assertion assertion) {
        return true;
    }
}

The definition of the TestHandler.java is this,

package org.wso2.testa2m;

import org.apache.axis2.AxisFault;
import org.apache.axis2.context.MessageContext;
import org.apache.axis2.engine.Handler;
import org.apache.axis2.handlers.AbstractHandler;
import org.apache.commons.logging.Log;
import org.apache.commons.logging.LogFactory;

public class TestHandler extends AbstractHandler implements Handler{
    private static final Log log = LogFactory.getLog(TestHandler.class);
    private String name;

    public String getName() {
        return name;
    }

    public InvocationResponse invoke(MessageContext msgContext) throws AxisFault {
        log.info("The web service "+msgContext.getAxisService().toString()+".");
        log.info("The operation is "+msgContext.getAxisOperation().toString()+".");
        log.info("This is the SOAP envelop : "+msgContext.getEnvelope().toString());
        return InvocationResponse.CONTINUE;        
    }

    public void revoke(MessageContext msgContext) {
        log.info("The web service "+msgContext.getAxisService().toString()+".");
        log.info("The operation is "+msgContext.getAxisOperation().toString()+".");
        log.info("This is the SOAP envelop : "+msgContext.getEnvelope().toString());
    }

    public void setName(String name) {
        this.name = name;
    }
}


After doing these, go the eclipse project folder in your machine, then in the TestModule folder you can find a folder called bin which has the generated class files of the project. Go inside it and create a folder called META-INF. In side it create the module.xml file. This is the definition of that file,

<module name="TestModule" class="org.wso2.testa2m.TestModule">
    <InFlow>
        <handler name="InFlowLogHandler" class="org.wso2.testa2m.TestHandler">
            <order phase="TestPhase"/>
        </handler>
    </InFlow>

    <OutFlow>
        <handler name="OutFlowLogHandler" class="org.wso2.testa2m.TestHandler">
            <order phase="TestPhase"/>
        </handler>
    </OutFlow>

    <OutFaultFlow>
        <handler name="FaultOutFlowLogHandler" class="org.wso2.testa2m.TestHandler">
            <order phase="TestPhase"/>
        </handler>
    </OutFaultFlow>

    <InFaultFlow>
        <handler name="FaultInFlowLogHandler" class="org.wso2.testa2m.TestHandler">
            <order phase="TestPhase"/>
        </handler>
    </InFaultFlow>
</module>

After doing that your now in a position to create your module archive file. Go to bin folder of your project using terminal and execute foll wing command,

jar -cvf TestModule.mar *

It will create the archive file needed. Copy it to the repository/modules folder of your axis2 home folder. Now your module is ready to be deployed. Now you have to do some configuration to execute your module. Conceptually Apache Axis2 modules can be executed in two ways,
  • Globally for all the services hosted in Axis2. To do this you have to edit the axis2.xml file
  • Per Service. To do this you have to edit the services.xml file also.
You can find axis2.xml file in the conf folder of axis2 home folder. Edit it like this to add your custom phases to the configuration. In the phases section add the entries which are highlighted to add your definition of custom phase called "TestPhase",

    <!-- ================================================= -->
    <!-- Phases  -->
    <!-- ================================================= -->
    <phaseOrder type="InFlow">
        <!--  System predefined phases       -->
        <phase name="Transport">
            <handler name="RequestURIBasedDispatcher"
                     class="org.apache.axis2.dispatchers.RequestURIBasedDispatcher">
                <order phase="Transport"/>
            </handler>
            <handler name="SOAPActionBasedDispatcher"
                     class="org.apache.axis2.dispatchers.SOAPActionBasedDispatcher">
                <order phase="Transport"/>
            </handler>
        </phase>
        <phase name="Addressing">
            <handler name="AddressingBasedDispatcher"
                     class="org.apache.axis2.dispatchers.AddressingBasedDispatcher">
                <order phase="Addressing"/>
            </handler>
        </phase>
        <phase name="Security"/>
    <!-- +++++++Cutome Pahse I have Added+++++++  -->
     <phase name="TestPhase"/>
    <!-- +++++++++++++++++++++++++++++++++++++++ -->
        <phase name="PreDispatch"/>
        <phase name="Dispatch" class="org.apache.axis2.engine.DispatchPhase">
            <handler name="RequestURIBasedDispatcher"
                     class="org.apache.axis2.dispatchers.RequestURIBasedDispatcher"/>
            <handler name="SOAPActionBasedDispatcher"
                     class="org.apache.axis2.dispatchers.SOAPActionBasedDispatcher"/>
            <handler name="RequestURIOperationDispatcher"
                     class="org.apache.axis2.dispatchers.RequestURIOperationDispatcher"/>
            <handler name="SOAPMessageBodyBasedDispatcher"
                     class="org.apache.axis2.dispatchers.SOAPMessageBodyBasedDispatcher"/>
            <handler name="HTTPLocationBasedDispatcher"
                     class="org.apache.axis2.dispatchers.HTTPLocationBasedDispatcher"/>
            <handler name="GenericProviderDispatcher"
                     class="org.apache.axis2.jaxws.dispatchers.GenericProviderDispatcher"/>
            <handler name="MustUnderstandValidationDispatcher"
                     class="org.apache.axis2.jaxws.dispatchers.MustUnderstandValidationDispatcher"/>
        </phase>
        <phase name="RMPhase"/>
        <!--  System predefined phases       -->
        <!--   After Postdispatch phase module author or service author can add any phase he want      -->
        <phase name="OperationInPhase">
            <handler name="MustUnderstandChecker"
                     class="org.apache.axis2.jaxws.dispatchers.MustUnderstandChecker">
                <order phase="OperationInPhase"/>
            </handler>
        </phase>
        <phase name="soapmonitorPhase"/>
    </phaseOrder>
    <phaseOrder type="OutFlow">
        <!--      user can add his own phases to this area  -->
        <phase name="soapmonitorPhase"/>
        <phase name="OperationOutPhase"/>
        <!--system predefined phase-->
        <!--these phase will run irrespective of the service-->
        <phase name="RMPhase"/>
        <phase name="PolicyDetermination"/>
        <phase name="MessageOut"/>
        <phase name="Security"/>
    <!-- +++++++Cutome Pahse I have Added+++++++  -->
     <phase name="TestPhase"/>
    <!-- +++++++++++++++++++++++++++++++++++++++ -->
    </phaseOrder>
    <phaseOrder type="InFaultFlow">
        <phase name="Addressing">
            <handler name="AddressingBasedDispatcher"
                     class="org.apache.axis2.dispatchers.AddressingBasedDispatcher">
                <order phase="Addressing"/>
            </handler>
        </phase>
        <phase name="Security"/>
    <!-- +++++++Cutome Pahse I have Added+++++++  -->
     <phase name="TestPhase"/>
    <!-- +++++++++++++++++++++++++++++++++++++++ -->
        <phase name="PreDispatch"/>
        <phase name="Dispatch" class="org.apache.axis2.engine.DispatchPhase">
            <handler name="RequestURIBasedDispatcher"
                     class="org.apache.axis2.dispatchers.RequestURIBasedDispatcher"/>
            <handler name="SOAPActionBasedDispatcher"
                     class="org.apache.axis2.dispatchers.SOAPActionBasedDispatcher"/>
            <handler name="RequestURIOperationDispatcher"
                     class="org.apache.axis2.dispatchers.RequestURIOperationDispatcher"/>
            <handler name="SOAPMessageBodyBasedDispatcher"
                     class="org.apache.axis2.dispatchers.SOAPMessageBodyBasedDispatcher"/>
            <handler name="HTTPLocationBasedDispatcher"
                     class="org.apache.axis2.dispatchers.HTTPLocationBasedDispatcher"/>
            <handler name="GenericProviderDispatcher"
                     class="org.apache.axis2.jaxws.dispatchers.GenericProviderDispatcher"/>
            <handler name="MustUnderstandValidationDispatcher"
                     class="org.apache.axis2.jaxws.dispatchers.MustUnderstandValidationDispatcher"/>
        </phase>
        <phase name="RMPhase"/>
        <!--      user can add his own phases to this area  -->
        <phase name="OperationInFaultPhase"/>
        <phase name="soapmonitorPhase"/>
    </phaseOrder>
    <phaseOrder type="OutFaultFlow">
        <!--      user can add his own phases to this area  -->
        <phase name="soapmonitorPhase"/>
        <phase name="OperationOutFaultPhase"/>
        <phase name="RMPhase"/>
        <phase name="PolicyDetermination"/>
        <phase name="MessageOut"/>
        <phase name="Security"/>
    <!-- +++++++Cutome Pahse I have Added+++++++  -->
     <phase name="TestPhase"/>
    <!-- +++++++++++++++++++++++++++++++++++++++ -->
    </phaseOrder>

After doing that you are successfully introduced the phase you have created manually, Now it is time to define the execution type of your module,
To excute it globally, add the <module ref="TestModule"/> entry to to the Global section of the axis2.xml.

    <!-- ================================================= -->
    <!-- Global Modules  -->
    <!-- ================================================= -->
    <!-- Comment this to disable Addressing -->
    <module ref="addressing"/>
    <module ref="TestModule"/>
    <!--Configuring module , providing parameters for modules whether they refer or not-->
    <!--<moduleConfig name="addressing">-->
    <!--<parameter name="addressingPara">N/A</parameter>-->
    <!--</moduleConfig>--> 

If you want to add a module specially for a service, add <module ref="TestModule"/> to the service.xml file. Then it will only executed only for that service.
Now your custom module is sucessfully deployed. Now you can start your axis2server again. It will show following log message if your module is successfully loaded. 

[INFO] Deploying module: TestModule - file:/home/andunslg/My_Works/Axis2_Code/modules/distribution/target/axis2-1.7.0-SNAPSHOT/repository/modules/TestModule.mar

After that to check it's functionality use the soapUI. Copy your web service's WSDL files link and create a soapUI project using that. If you are successful you will have a project which looks like this,


Double click on add,  it will show you are SOAP message. Add parameters to the add function and send it. The web service will reply to your message if you have successfully did all the things. If it is this kind of reply will come,


To see what your module to you have to see in to your terminal where you run the axis2server. In that you can see that following log entries are shown. Those are generated by the module you have created.

[INFO] The web service TestWebService.
[INFO] The operation is org.apache.axis2.description.InOutAxisOperation@2ce99681.
[INFO] This is the SOAP envelop : <?xml version='1.0' encoding='utf-8'?><soapenv:Envelope xmlns:soapenv="http://schemas.xmlsoap.org/soap/envelope/" xmlns:tes="http://testws.wso2.org"><soapenv:Body>
      <tes:add>
         <tes:args0>3</tes:args0>
         <tes:args1>2</tes:args1>
      </tes:add>
   </soapenv:Body></soapenv:Envelope>
[INFO] The web service TestWebService.
[INFO] The operation is org.apache.axis2.description.InOutAxisOperation@2ce99681.
[INFO] This is the SOAP envelop : <?xml version='1.0' encoding='utf-8'?><soapenv:Envelope xmlns:soapenv="http://schemas.xmlsoap.org/soap/envelope/"><soapenv:Body><ns:addResponse xmlns:ns="http://testws.wso2.org"><ns:return>5</ns:return></ns:addResponse></soapenv:Body></soapenv:Envelope>


Up to now you have added custom module to AXIS2 to extend it. You can define any task in side your handler definition to o in your module. If you have any problem please contact me.

Saturday, May 26, 2012

What is Remote Debugging - Java, Eclipse,IntelliJ IDEA, AXIS2

Now I am working as a Software Engineering Intern at WSO2. At the first week of internship with the WSO2 Application Server team, I have learned a pretty cool concept in software development called Remote Debugging of application. I feel that is a pretty strong concept which I should talk about. To learn about remote debugging I have gone through lot of articles all around the Internet. So I thought that getting all those information to one place.
If we look at to the Remote Debugging scenario it will look like this,


Some times you have to debug a application which is not running from it's source code in a IDE. So to do it we use this remote debug concept. In the scenario which is shown above the application runs in a remote machine, but when it runs it will broadcast debug information via a socket deployed. The IDE running locally will capture those broadcast debug information through that socket and it will do the debug through the source code.

JAVA language provides this in its JVM. We can use commands like this to run a application in the remote debug mode in java.

java -Xdebug -Xrunjdwp:transport=dt_socket,address=8000,suspend=n,server=y -jar Name_of_Your_Jar.jar

Then it will broadcast some debug information and will wait until some IDE capture those debug information and start debugging the source code. When Some IDE connects to the Socket specified it will start the debugging process.

Configuring the IDEs will depend on them. The links given below will give you a good understanding about those concepts. Hope you learn some thing from this post. Following links are really interesting to learn about remote debugging.

What is Remote Debugging :
http://www.javabeat.net/2010/12/what-is-remote-debugging-in-java/

Remote Debugging with Eclipse :
http://www.eclipsezone.com/eclipse/forums/t53459.html
http://java.dzone.com/articles/how-debug-remote-java-applicat
http://www.myeclipseide.com/documentation/quickstarts/remotedebugging/

Remote Debugging with IntelliJ IDEA :
http://www.javaranch.com/journal/200408/DebuggingServer-sideCode.html

Remote Debugging Web Services, Apache Axis 2 :
http://wso2.org/library/225
http://wso2.org/library/3851
http://amilamanoj.blogspot.com/2011/09/running-debugging-apache-axis2-inside.html
http://shameerarathnayaka.blogspot.com/2011/09/remote-debugging-apache-axis2-with.html

Sunday, April 1, 2012

Creating Timetable Using Genetic Algorithms - Java & JGAP

Making Timetables for an institution, considering the resources of that institution so that the resources will not be clashed on the usage with one another is NP complete task. But here we tried to implement a solution for that using Genetic Algorithms.. If we take our scenario as an example, our department needs to schedule its lecture slots so that no clashes are happening between the availability of the resources of the department. As department’s resources, we have considered lecturers’, rooms’ and students’ availabilities. If a lecture is to be held, all those who are conducting, those who are attending and the rooms where the lecture is going to held must be free at that time. So the problem is to find a way to generate a timetable. 

What is Genetic Algorithms (GA)
Genetic Algorithm (GA) is a type of Evolutionary Algorithms which adapts the evolutionary process of the genetic chromosomes into some computational problems. It has been widely used in optimization problems. In Genetic Algorithms there are basically two major components. 
  • Population
  • Fitness function
The population is which the evolution is applied on. With the evolution and the correct Fitness function which measures the fitness of a given individual entity in a population, the following generations will have better members than the earlier generation. An individual element of the population is named a Chromosome following the chromosomes in the natural genetic process. A chromosome is consisted of Genes which are in-turn consists of the data which we want the chromosome to have. Within each iteration many genetic operators are applied to the population so the next generation will be different from the current one. There are basic operators we have used in our attempt.
  • Cross-over
  • Mutation
In cross-over operation, genes from 2 chromosomes are combined to make other new chromosomes. And in mutation, some genes of a chromosome are mutated in a way that the random behaviors can be generated. This randomness important because as the iterations happen, the population tends to converge to some solution while there may be some solutions which can be more acceptable. As GA doesn’t generate the best solution but an acceptable one we have to optimize the evolution process due to the fact that an inefficient application of GA could get long time before making an acceptable solution

Application Of Genetic Algorithms

The most difficult and challenging task of the project was the application of GA into our problem. The way of application could affect the amount of resources required by the program.
We considered the lecturers, students and rooms as constraints which will be needed to be satisfied. Each constraint contains a representation of which time slots they are available and the other time slots are considered unavailable. Each subject will have the identifications of the lecturers, students and the rooms involved with the subject and lecture slots will contain the subject and the time slots which the lecture is to be held.
In genetic algorithms the base elements of the algorithm are Chromosomes and Genes. So here we had to choose them. We will explain how we did it in next section. Also to run the algorithm we have to check the appropriateness of those genes and chromosomes. To do it we have to run a check to get the fitness for the solution. That check is run by the fitness function. We will explain it also in the next section

Implementation

For the implementation we have used Java language for programming. We used a framework named JGAP (Java Genetic Algorithm and Genetic Programming framework) for the implementation of the Genetic Algorithm. We used Java Swing framework for implementing the GUIs and data was stored in a XML file for manipulation. To represent the data used for the algorithm, we used a XML file. Following XML examples will show we did it,Each start time and other time are represented in this format,

If the time is Monday at 8 am = we represent it as 8
If the time is Monday at 1 pm = we represent it as 13
If the time is Tuesday at 8 am = we represent it as 24+8 = 32
If the time is Thursday at 3 pm = we represent it as 24+24+24+15 = 87

All the length of time slots is given in hours.

Lecturer Entity
<?xml version="1.0" encoding="UTF-8" standalone="no"?>
<lecturers count="1" >
 <lecturer id="0" >
  <name>Dr_Chandana_Gamage</name>
  <availableSlots count="5" >
   <slot>
    <start>8</start>
    <length>8</length>
   </slot>
   <slot>
    <start>32</start>
    <length>4</length>
   </slot>
   <slot>
    <start>56</start>
    <length>8</length>
   </slot>
   <slot>
    <start>80</start>
    <length>8</length>
   </slot>
   <slot>
    <start>104</start>
    <length>8</length>
   </slot>
  </availableSlots>
 </lecturer>
</lecturers>

Student Entity
<students count="1" >
    <student id="0" >
        <name>Sanka</name>
        <level>2</level>
        <availableSlots count="5" >
            <slot>
                <start>8</start>
                <length>10</length>
            </slot>
            <slot>
                <start>32</start>
                <length>10</length>
            </slot>
            <slot>
                <start>56</start>
                <length>10</length>
            </slot>
            <slot>
                <start>80</start>
                <length>10</length>
            </slot>
            <slot>
                <start>104</start>
                <length>10</length>
            </slot>
        </availableSlots>
    </student>
</students>
 

Subject Entity

Here each lecturers and students who are related the subject is represented by their id number. The potential lecture rooms for this subject is also represented by their id.  Also another important thing here is lectures and practicals of subject considered as two different subject in this implementation. That why there is a tag called isPractical.
<subjects count="1" >
    <subject id="0" >
        <name>TOC</name>
        <isAPractical>0</isAPractical>
        <lecturers count="2" >
            <id>0</id>
            <id>1</id>
        </lecturers>
        <students count="2" >
            <id>0</id>
            <id>1</id>
        </students>
        <rooms count="3" >
            <id>0</id>
            <id>1</id>
            <id>2</id>
        </rooms>
    </subject>
</subjects>

Lecture Room Entity

Here the lecture rooms and labs are identified by the tag iLectureRoom.
<rooms count="1" >
    <room id="0" >
        <name>CSLR</name>
        <seatCount>20</seatCount>
        <isLectureRoom>1</isLectureRoom>
        <availableSlots count="9" >
            <slot>
                <start>8</start>
                <length>4</length>
            </slot>
            <slot>
                <start>13</start>
                <length>5</length>
            </slot>
            <slot>
                <start>37</start>
                <length>5</length>
            </slot>
            <slot>
                <start>56</start>
                <length>4</length>
            </slot>
            <slot>
                
            </slot>
            <slot>
                <start>80</start>
                <length>4</length>
            </slot>
            <slot>
                <start>85</start>
                <length>5</length>
            </slot>
            <slot>
                <start>104</start>
                <length>4</length>
            </slot>
            <slot>
                <start>109</start>
                <length>5</length>
            </slot>
        </availableSlots>
    </room>
</rooms>

Lecture Entity

This is the most important entity in the XML representation. Here the data in side lecture tag represent the time table. At the beginning, before the time table generating algorithm runs we have add lecture entity. But the start time of the lecture,venue cant be said at the beginning. So we used the following approach to represent the lecture data,
<lectures count="1" >
       <lecture id="0" level="2" >
           <subject>0</subject>
           <room>0</room>
           <slot>
                <start>0</start>
                <length>2</length>
           </slot>
       </lecture>
</lectures>
Here the room,start tags cant be finalized at the beginning. Because they change while the time table algorithm runs. So at the beginning we set them to default value of 0. All the lecture entries will be same as that at the beginning. But after the time table algorithm runs, those tags will be change like this,
<lectures count="1" >
       <lecture id="0" level="2" >
           <subject>0</subject>
           <room>3</room>
           <slot>
                <start>15</start>
                <length>2</length>
           </slot>
       </lecture>
</lectures>


We followed five basic steps to implement the Algorithm.

  1. Plan the Chromosome.
We have decided following structure of chromosomes and genes. We choose the four time tables set as a chromosome and each one time table as a gene. For each evolving iteration those genes and chromosomes are changed by crossover and mutation.
 
  1. Implement a "fitness function".

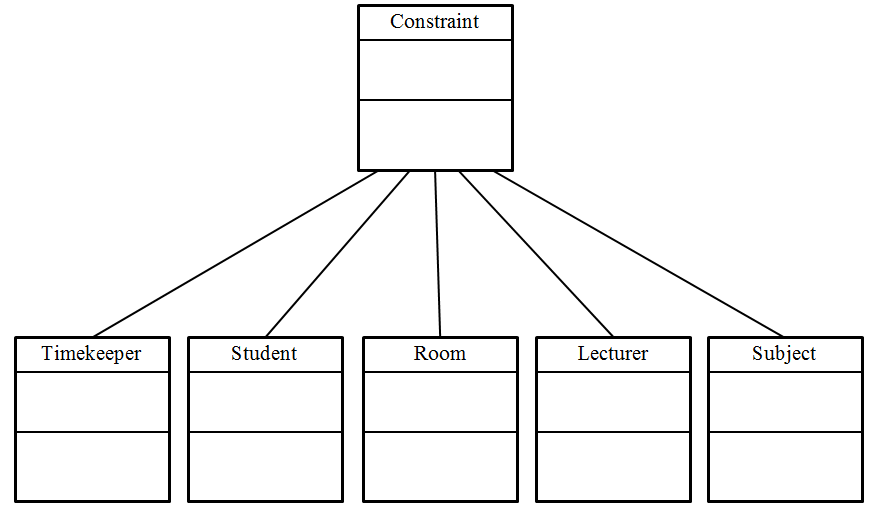
    To Implement a fitness function in this problem. We have to add constrains to be checked in the fitness function. So following structure we implemented for the constrains.

 
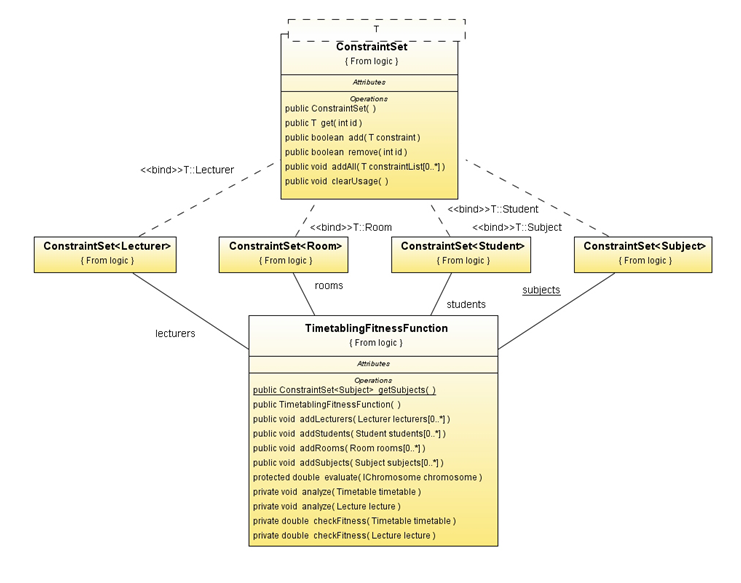
At the concrete  implementation of these constrains we follow the following structure,

  1. Setup a Configuration object.
  1. Create a population of potential solutions.

  1. Evolve the population
    Generating a good solution set from the initially created solution set is process of evolution in genetic algorithms. To evolve a population of solutions we took two approaches. One is changing a  chromosome Little bit by changing a lecture time or venue and checking it with the fitness functions to check the fitness. If the fitness is up to some value it will put to the next population. This process is called the mutation process.
    Other process is called the cross over process. In it we took one part form one chromosome and other part form other chromosome. Then we join it to have a new solution. Then we check with the fitness functions to check the fitness. If the fitness is up to some value it will put to the next population.
    So in the evolution process these two happens for the population to get the next population. So what we did was evolving the initial population for number of iteration to get the new populations. At each evolution the population move towards the optimal solution. The number of evolutions is proportional to the correctness of the population. So following graph will show how our implementation behaves with respect to the number of evolutions. Here the y axis gives the fitness value of the population,


So like wise doing number of evolutions we can deduce a good timetable according to our given constrains. We have created a GUI also so user of this solution can change those constraints easily.

Thursday, March 1, 2012

Service Oriented Architecture(SOA) - Business Transformation to SOA

Still I am undergraduate. So I learn lot about Service oriented architecture these days. I found this research paper with really interesting points about SOA. This will be great article for beginner fro SOA in enterprise.The original paper is Business Transformation to SOA: Aspects of the Migration and Performance and QoS Issues by Liam O’Brien, Paul Brebner, Jon Gray


In the present world Service Oriented architecture is really important factor to have a successful business. SOA is a great tool for solve the problems of meet new customer demands with fewer resources and streamlining of its business activities. SOA is better because of it’s their promise of cost-efficiency, agility, adaptability and legacy leverage. But to have that success there are so many difficulties. Also there are lot of things have to be considered before moving in to SOA. So in this paper writers discuss about those aspects.
So most of the current organizations transform their business process and IT business systems to SOA because of the arising new challenges and have to respond to customer demands. Organizations do rationalization programs to determine what strategies they will pursue in the future, what business processes will support those strategies and determine what IT systems are needed to move in to SOA.
Also organizations have to think lot about one major thing before moving in to SOA that is systems should be whether or not those systems can meet Quality of Service (QoS) requirements. Because SOA can have a positive impact on some quality attributes and a negative impact on others. Some these attributes are security, performance, availability and interoperability of their SOA-based systems.
There are list of things should be considers
  • What are the existing/legacy systems which should be included in the SOA architecture?
  • The acquisition and development of an SOA Infrastructure.
  •  The development of services and development of applications from services.
Identification and Mining of Services
Organizations have to think about, what are the components which can be migrated from exiting system to SOA based system. Because they have already invested money in those components. To do that,
  • Organizations have to develop an overall Enterprise Architecture, to identify required business processes and identifying services that are needed. Also they can examine each of its existing systems, identify common processes/functions and identify services from these. Then they can identify what services are to be used within its SOA. This is a really critical task.
  • Determine what legacy/existing components can satisfy the service needs, determine what needs to be done with those components and migrate and reuse them as services. Doing this organization can understand what will be the costs attached to them.
Integration of Services
If an organization moved to SOA they will use services either internal or external, so those services have to be integrated in to existing systems of the organization. They have to determine what systems the services will integrate with, the scope of the work involved and estimate the cost and effort of doing the work.
Also organizations have to determine what the impact of different architecture alternatives will
be on various quality attributes and QoS concerns for the system. An organization can choose a particular architecture alternative based on their specific requirements. A main issue in integration of services is how so size integration effort and what are the various parts that make up the cost. 

Development of an SOA Infrastructure
To implement SOA, organization should have to have infrastructure which includes security, governance, management, orchestration and resourcing attributes. Bad infrastructure components, insufficient validation implementation and less security, management and troubleshooting will cause all the SOA architecture in to trouble.
There are so many vendors like IBM, Microsoft, SAP, Oracle, BEA, and many others which provide SOA infrastructure technology. Organizations have to think about plan what they will purchase and what are they going to build them self’s. But if infrastructure is built within the organization they have to think about, how des an organization test the infrastructure sufficiently to guarantee the level of security, governance and management provided meets their requirements? Any way organizations have to think about interoperability between different vendor infrastructures.

Service Development and Application Development from Services
When an organization moves in to SOA they have to use their own service and service from other organizations. When dealing with the development of services and applications from services one of the main concerns is dealing with the quality of service of the services and the quality of service of the application. Organizations have to have list of quality attributes they need and they have to follow a development process which guarantee acquiring those attributes.
If external services are used in the development of an application then service level agreements with the service providers will have to be negotiated and be in place in order to make any guarantees about the QoS level of the application.
There can be also a scenario, application chooses service dynamically. Then we can have QoS guaranteed. Because we can’t test those dynamic services.
At last one important thing, organizations have to identify the cost and effort needs to develop its service.

SOA Governance
SOA governance is another important thing in the planning process. These factors will be considered to have stable governance,
  • Strategy and Goals – what is governed and why?
  • Funding, Ownership and Approvals – who owns what?
  • What gets funded and by whom?
  • Organization – what structures, processes and governance mechanisms are in place?
  • Processes – what are the roles, responsibilities and procedures for managing SOA activities?
  • Policies – what is the enforcement issues including standards, security, release and re-use?
  • Metrics – what are the business outcomes and how are they measured and by what metrics?
  • Behavior – what is the behavioral model, incentives, penalties and rewards for appropriate “SOA Behavior”?
PERFORMANCE AND QOS
Performance is a major concern while architecting and developing SOA for both services and applications. Because for an example if take response time as performance measure of web services, it is typically worse than the bare underlying functionality. This is due to and compounded by the overheads of XML, use of composite, service orchestration (infrastructure and protocols), service invocation, resources and resource models.
Because of those reasons most of the time consumer’s expectations of performance may be higher than what can actually be delivered. So it is really important to architect SOAs with performance in mind. To do this it is necessary to be able to understand the performance To do it architects have to think about these thing in depth, Service Orchestration, Virtualization and Service Level Agreements between service users and consumers.
Also this area is highly developing are in the present world. Most of the people are working to develop SOA with good quality attributes. 

Revived by Andun S.L. Gunawardana –andunslg@gamil.com

Cloud Computing - The Cloud Reference Model

This article was totally based on a research paper called Defining a Cloud Reference Model by Teresa Tung (teresa.tung@accenture.com). In this paper they introduce a new reference model for cloud computing. As OSI model for networking. So I thought sharing this will be good.


A general meaning of “cloud” in computer world is a collection of network-hosted services accessible from anywhere with the following attributes: elastically scalable, illusion of infinite capacity, available on-demand, and consumption based charges.
Throughout the past several years cloud computing is a buzzword. But its meaning is confusing for most of the people. Also cloud has conflicts on policy issues including legal, indemnity, and compliance, and on technology issues around security, reliability, and performance. Reasons for these are cloud-based application architecture is confusing. First the term “cloud” is overloaded and used by many vendors also cloud’s on-demand and scalability features are new and architects are still working to understand how to leverage these capabilities.
The Cloud Reference Model brings order to this cloud confusing cloud computing model. The Model divides cloud-based application architecture into seven layers: Application, Transformation, Control, Instantiation, Appliance, Virtual, and Physical. In this model each layer has its own IT functionality on supporting a specific area of concern and abstracts details of other layers. So having this reference model we can think application architecture as the process of determining the necessary functionality at each layer and assessing attributes like performance, security, and reliability is decoupled. So though out this discussion we talk about that.
Using this new reference model for cloud computing it becomes easy to evaluate the benefit of cloud. Anyone can use the Model to breakdown technology and policies to layers. Also model is defined so that per-layer solutions interface with adjacent layers. So each layer is reusable, and people can properly combining the solutions to create an overall architecture for applications like portals, batch, and distributed file systems.
The major layers of the Cloud Model are,
  1. Application Layer
  2. Transformation Layer
  3. Control Layer
  4. Instantiation Layer
  5. Appliance Layer
  6. Virtualization Layer
  7. Physical Layer
Application Layer: This layer specifies the overall application functionality and end-user experience. Also this layer is responsible for sets up the application program. User-generated content like code, data, static files, and executables specifies the application program. The content format and representation determine the required application architecture.
Transformation Layer: This layer transforms application program for execution on the specific compute environment. It converts content and metadata from the Application Layer to the required format for storage or execution on the specific platform. It do things like encrypting, encoding for error correction, segmenting large data objects into smaller units, reformatting data structures into XML, or applying business logic to structure data etc.
Control Layer: Generally Control Layer algorithms ultimately determine how the platform is created. It prescribes the optimized set of virtual machine appliances required to form the desired compute platform. Controller logic determines the quantity, type, and location of virtual appliances to create the desired compute platform. So controller logic assigns the formatted content from the Transformation Layer across the prescribed deployment.
The Instantiation Layer: Instantiation Layer decides how provisioning and configuration occurs specific to the infrastructure provider. It executes the specification of the Control Layer. For example it applies the IP address and updates the DNS.
The Appliance Layer: In a single sentence The Appliance Layer functions create the images and templates of the specific appliance used in the compute platform. This layer adds middleware to a virtual machine to create a virtual machine appliance. For example we can think Linux operating system, Apache HTTP server, MySQL database, and Python scripting language forms an appliance with the LAMP solution stack.
The Virtualization Layer: This is responsible for produces the virtualized representation of the compute resources. There are Management software in this layer to handle the virtualization management of server images, generic storage volumes, and logical network connections.
The Physical Layer: This layer maintains the physical devices that perform the compute operations. This layer includes the IT hardware for compute platform.
The Cloud Reference Model can be used to evaluate vendors and design attributes. Each layer of the model focuses concerns on one aspect of overall design making it easier to characterize capability.
After carefully looking at the current situation in the world, we can see two major points. First the need to characterize offerings and not service providers.
Second how this new reference model expands the functionality of today’s “as –a –service” characterization. IaaS offerings provide virtualized compute resources at the Virtual Layer. Then Platform-as-a-Service (PaaS) offerings provide the Control Layer’s compute platform for execution of user-generated program. And then Software-as-a-Service (SaaS) supplies programs at the Application Layer like for Customer Relationship Management, E-mail, or SharePoint.
Revived by Andun S.L. Gunawardana –andunslg@gamil.com

Friday, February 24, 2012

Accessing Apache Axis2 Web service inside a Android Application - Part 2 - Apache Axis 2, Android API 8, phpmyadmin, Eclipse Indigo, VMware Player

Part 2

As I explained in my earlier post,  Accessing Apache Axis2 Web service inside a Android Application - Part 1 you can create a web service. In this post I will explain how to create a android application use this web service. In my example's web service, it can give you details about cities and places in Sri Lanka. So we will query that service to get those data,

Step 1 - Create a new android project in Eclipse.
Step 2 - Add internet permission to the Android Application by editing AndroidManifest.xml file like this.

<?xml version="1.0" encoding="utf-8"?>
<manifest xmlns:android="http://schemas.android.com/apk/res/android"
    package="org.web.frontend.calculator"
    android:versionCode="1"
    android:versionName="1.0" >

    <uses-sdk android:minSdkVersion="8" />
    <uses-permission android:name="android.permission.INTERNET" />
    <application
        android:icon="@drawable/ic_launcher"
        android:label="@string/app_name" >
        <activity
            android:name=".AndroidFrontendActivity"
            android:label="@string/app_name" >
            <intent-filter>
                <action android:name="android.intent.action.MAIN" />

                <category android:name="android.intent.category.LAUNCHER" />
            </intent-filter>
        </activity>
    </application>

</manifest>
Step 3 - Edit the main.xml file like this.

<?xml version="1.0" encoding="utf-8"?>
<LinearLayout xmlns:android="http://schemas.android.com/apk/res/android"
    android:layout_width="fill_parent"
    android:layout_height="fill_parent"
    android:orientation="vertical" >
    <TextView
        android:id="@+id/txtCityLongitude"
        android:layout_width="fill_parent"
        android:layout_height="wrap_content"
        android:text="@string/hello" />
    <TextView
        android:id="@+id/txtCityLatitude"
        android:layout_width="fill_parent"
        android:layout_height="wrap_content"
        android:text="@string/hello" />
    <TextView
        android:id="@+id/txtIMLon"
        android:layout_width="fill_parent"
        android:layout_height="wrap_content"
        android:text="@string/hello" />
    <TextView
        android:id="@+id/txtIMLat"
        android:layout_width="fill_parent"
        android:layout_height="wrap_content"
        android:text="@string/hello" />
    <TextView
        android:id="@+id/txtIMCat"
        android:layout_width="fill_parent"
        android:layout_height="wrap_content"
        android:text="@string/hello" />
    <TextView
        android:id="@+id/txtIMDes"
        android:layout_width="fill_parent"
        android:layout_height="wrap_content"
        android:text="@string/hello" />

</LinearLayout>


Step 3 - I use KSOAP as my connection between web service and Android App. So download it from here. 

kSOAP2 - An efficient, lean, Java SOAP library for constrained devices

Add it to your android project. Right click on your project go to Java Build Path > Add External Jar
and select kSOAP.

Step 4 - Edit the java activity file like this.

package org.web.frontend.calculator;

import org.ksoap2.SoapEnvelope;
import org.ksoap2.serialization.SoapObject;
import org.ksoap2.serialization.SoapSerializationEnvelope;
import org.ksoap2.transport.HttpTransportSE;
import android.app.Activity;
import android.os.Bundle;
import android.widget.TextView;

public class AndroidFrontendActivity extends Activity {

    private String METHOD_NAME = "";
    // our webservice method name
    private String NAMESPACE = "http://ws.travel_ceylon.web.org";
    // Here package name in webservice with reverse order.
    private String SOAP_ACTION = NAMESPACE + METHOD_NAME;
    // NAMESPACE + method name
    private static final String URL = "http://192.168.177.130:8080/Travel_Ceylon_Central_Web_Service/services/Travel_Ceylon_Web_Service?wsdl";

    // you must use ipaddress here, don’t use Hostname or localhost

    /** Called when the activity is first created. */
    @Override
    public void onCreate(Bundle savedInstanceState) {
        super.onCreate(savedInstanceState);
        setContentView(R.layout.main);

        String city = "Matara";
        String im = "Galle Face";

        METHOD_NAME = "getLongitude_City";
        try {
            SoapObject request = new SoapObject(NAMESPACE, METHOD_NAME);
            request.addProperty("city", city);
            SoapSerializationEnvelope envelope = new SoapSerializationEnvelope(
                    SoapEnvelope.VER11);
            envelope.dotNet = true;
            envelope.setOutputSoapObject(request);
            HttpTransportSE androidHttpTransport = new HttpTransportSE(URL);
            androidHttpTransport.call(SOAP_ACTION, envelope);
            Object result = envelope.getResponse();
            ((TextView) findViewById(R.id.txtCityLongitude)).setText(city
                    + " Longitude is : " + result.toString());

        } catch (Exception E) {
            E.printStackTrace();
            ((TextView) findViewById(R.id.txtCityLongitude)).setText("ERROR:"
                    + E.getClass().getName() + ":" + E.getMessage());
        }
        METHOD_NAME = "getLatitude_City";
        try {
            SoapObject request = new SoapObject(NAMESPACE, METHOD_NAME);
            request.addProperty("city", city);
            SoapSerializationEnvelope envelope = new SoapSerializationEnvelope(
                    SoapEnvelope.VER11);
            envelope.dotNet = true;
            envelope.setOutputSoapObject(request);
            HttpTransportSE androidHttpTransport = new HttpTransportSE(URL);
            androidHttpTransport.call(SOAP_ACTION, envelope);
            Object result = envelope.getResponse();
            ((TextView) findViewById(R.id.txtCityLatitude)).setText(city
                    + " Latitude : " + result.toString());

        } catch (Exception E) {
            E.printStackTrace();
            ((TextView) findViewById(R.id.txtCityLatitude)).setText("ERROR:"
                    + E.getClass().getName() + ":" + E.getMessage());
        }

        METHOD_NAME = "getLongitude_Im_Place";
        try {
            SoapObject request = new SoapObject(NAMESPACE, METHOD_NAME);
            request.addProperty("place", im);
            SoapSerializationEnvelope envelope = new SoapSerializationEnvelope(
                    SoapEnvelope.VER11);
            envelope.dotNet = true;
            envelope.setOutputSoapObject(request);
            HttpTransportSE androidHttpTransport = new HttpTransportSE(URL);
            androidHttpTransport.call(SOAP_ACTION, envelope);
            Object result = envelope.getResponse();
            ((TextView) findViewById(R.id.txtIMLon)).setText(im
                    + " Longitude : " + result.toString());

        } catch (Exception E) {
            E.printStackTrace();
            ((TextView) findViewById(R.id.txtIMLon)).setText("ERROR:"
                    + E.getClass().getName() + ":" + E.getMessage());
        }

        METHOD_NAME = "getLatitude_Im_Place";
        try {
            SoapObject request = new SoapObject(NAMESPACE, METHOD_NAME);
            request.addProperty("place", im);
            SoapSerializationEnvelope envelope = new SoapSerializationEnvelope(
                    SoapEnvelope.VER11);
            envelope.dotNet = true;
            envelope.setOutputSoapObject(request);
            HttpTransportSE androidHttpTransport = new HttpTransportSE(URL);
            androidHttpTransport.call(SOAP_ACTION, envelope);
            Object result = envelope.getResponse();
            ((TextView) findViewById(R.id.txtIMLat)).setText(im
                    + " Latitude : " + result.toString());

        } catch (Exception E) {
            E.printStackTrace();
            ((TextView) findViewById(R.id.txtIMLat)).setText("ERROR:"
                    + E.getClass().getName() + ":" + E.getMessage());
        }

        METHOD_NAME = "getCategory_Im_Place";
        try {
            SoapObject request = new SoapObject(NAMESPACE, METHOD_NAME);
            request.addProperty("place", im);
            SoapSerializationEnvelope envelope = new SoapSerializationEnvelope(
                    SoapEnvelope.VER11);
            envelope.dotNet = true;
            envelope.setOutputSoapObject(request);
            HttpTransportSE androidHttpTransport = new HttpTransportSE(URL);
            androidHttpTransport.call(SOAP_ACTION, envelope);
            Object result = envelope.getResponse();
            ((TextView) findViewById(R.id.txtIMCat)).setText(im
                    + " Category : " + result.toString());

        } catch (Exception E) {
            E.printStackTrace();
            ((TextView) findViewById(R.id.txtIMCat)).setText("ERROR:"
                    + E.getClass().getName() + ":" + E.getMessage());
        }

        METHOD_NAME = "getDescription_Im_Place";
        try {
            SoapObject request = new SoapObject(NAMESPACE, METHOD_NAME);
            request.addProperty("place", im);
            SoapSerializationEnvelope envelope = new SoapSerializationEnvelope(
                    SoapEnvelope.VER11);
            envelope.dotNet = true;
            envelope.setOutputSoapObject(request);
            HttpTransportSE androidHttpTransport = new HttpTransportSE(URL);
            androidHttpTransport.call(SOAP_ACTION, envelope);
            Object result = envelope.getResponse();
            ((TextView) findViewById(R.id.txtIMDes)).setText(im
                    + " Description : " + result.toString());

        } catch (Exception E) {
            E.printStackTrace();
            ((TextView) findViewById(R.id.txtIMDes)).setText("ERROR:"
                    + E.getClass().getName() + ":" + E.getMessage());
        }
    }
}


I will explain this code like this, Here are the variable assignments,


    private String METHOD_NAME = "";
    // Here you have to put your method you are calling
    // I am calling float getLongitude_City(String city) so I assign this variable like this. METHOD_NAME = "getLongitude_City";
    private String NAMESPACE = "http://ws.travel_ceylon.web.org";
    // Here package name in webservice with reverse order.
    private String SOAP_ACTION = NAMESPACE + METHOD_NAME;
    // NAMESPACE + method name
    private static final String URL = "http://192.168.177.130:8080/Travel_Ceylon_Central_Web_Service/services/Travel_Ceylon_Web_Service?wsdl";

    // you must use ipaddress here, don’t use Hostname or localhost
    // That is why I used a virtual machine to have a small network inside my machine.


Next I will explain the other part of the source,

  METHOD_NAME = "getLongitude_City";

  try {
   SoapObject request = new SoapObject(NAMESPACE, METHOD_NAME);
   request.addProperty("city", city);
   // Here we bind parmeters to our SOAP packet.
   // in my getLongitude_City"it has a argument called city of Stirng
   // type. This is the way I assigen value to it.

   SoapSerializationEnvelope envelope = new SoapSerializationEnvelope(
   SoapEnvelope.VER11);
   envelope.dotNet = true;
   envelope.setOutputSoapObject(request);
   HttpTransportSE androidHttpTransport = new HttpTransportSE(URL);
   androidHttpTransport.call(SOAP_ACTION, envelope);
   Object result = envelope.getResponse();
   // Here we get the reposnse from the SOAP object.
   ((TextView) findViewById(R.id.txtCityLongitude)).setText(city
   + " Longitude is : " + result.toString());
  } catch (Exception E) {
   E.printStackTrace();
   ((TextView) findViewById(R.id.txtCityLongitude)).setText("ERROR:"
   + E.getClass().getName() + ":" + E.getMessage());
  }


After doing all these editing. Go to the virtual machine and run the web service. Check the connectivity between virtual machine and your machine. Then run the Android app. then you can see these information come from the web service.


Hope this article helped you. Please put comments about my article. It will help me to improve my articles in the future.